
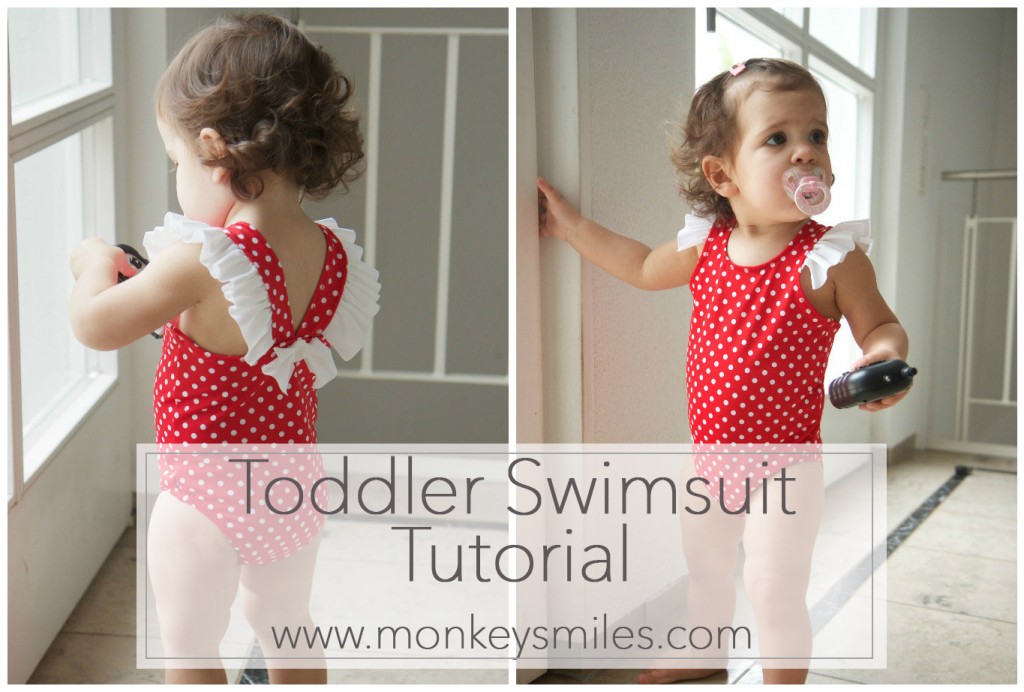
Of all the projects I was willing to take on, sewing a swimsuit was definitely not on that list. Call me crazy but the thought of trying to manipulate the fabric as it got pulled and stretched in my sewing machine just didn’t sit well with me. Then it happened. I found the cutest bathing suit ever, made by Eberjey. It was on sale and I had to have it….sold out. So I looked elsewhere and the only place I could find it was on the brand’s website for a price that makes my heart drop. Plus, the smallest size they sell is 2 years and I needed something closer to 18 months. So I decided to give it a try.
If you can afford it, I say go for it. But for those of us who need that money for groceries, here’s how I created the look alike for under $10.
What you’ll need:
- 1/2 yard of swimsuit fabric (4 way stretch)
- scraps of contrasting swimsuit fabric (optional)
- 1/4-3/8 inch elastic (3 yards)
- swim lining (optional)
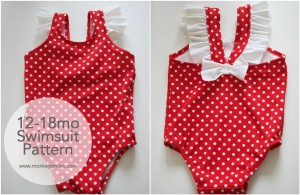
This is a 12-18 month pattern but if you need a different size, click here to see how I made this pattern so you can too! It is 4 pages long. When printing out the file, make sure the 1 inch square on the front page measures 1 inch for you. Line up the “back piece (bottom)” with the “back piece (top)” along the dotted lines. Line up the “front piece (bottom)” with the “front piece (top)” along the dotted lines. The straps on the “front piece (top)” will need to be extended to the size that is needed. You will also need to cut out “accessories” as listed below.
- For the bow, you’ll need 2 rectangles of fabric: 1 rectangle 3″x4″ and 1 rectangle 1″x2″
- For the flutter sleeves, you’ll need 2 rectangles (same size) of the same fabric you used for the bow, 2″x 19″.
Ok, let’s get to cutting! The reason I said you needed a 4 way stretch swim suit fabric is because we’ll be folding the fabric in half, length-wise since the straps are connected to the front pattern. Place your pattern along your folds, pin in place and get cutting (if you decided to use lining, cut the same patterns out of the lining as well except for the straps and accessories).
Constructing your suit:
If you decided to use lining (like I did), check out zaaberry’s instructions on how to construct the basic portion. She really explains it well! Then go from Step 6 below.
If you decided not to use lining, follow the steps below:
- With right sides of the front and back of the suit facing each other, stitch the crotch seam with a 1/2″ seam allowance. I have a regular sewing machine so I used a 3-point zig zag stitch for this.
- With right sides still together, stitch both side seams from tom of the leg hole up to the arm pit with a 1/4″ seam allowance. Again, I used a 3-point zig zag stitch for this. At this point, you should see how the suit fits.
- Cut a piece of elastic, 12″ in length and sew the ends together with a 3/8″ overlap. Do this twice to make two elastic circles.
- Pin your elastic to the leg hole edge of the wrong side of your fabric. The elastic should lie flat on the front part of your pattern and should be slightly stretched in the booty area. Stitch in place. I used a 3-point zig zag stitch for this.
- Fold elastic into the suit and topstitch. Again, I used a 3-point zig zag stitch for this.
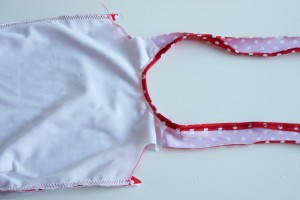
- Attach one long piece of elastic from the inside of one strap, down the neckline and up the inside of the other strap just as you did with the leg holes. You will not be stretching this elastic as you sew, so it should be the same length as the fabric you’re attaching it to.
- Topstitch.
- Flutter pieces: Gather one side of the flutter fabric rectangle(turn your tension knob to its highest setting and use a long stitch. DO NOT back stitch). Do this for both flutter rectangles.
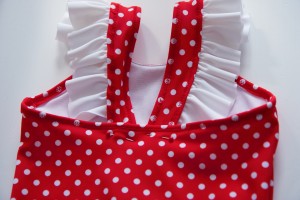
- Attach another long piece of elastic to the outside of one strap, around the back, and back up the outside of the other strap. You will need to stretch the elastic slightly just around the back. BEFORE topstitching the elastic, pin the fabric for the flutter pieces to the outside of the straps. One end of the flutter fabric should line up with the neckline. The other side should end just before (about 1/2 inch) where the strap will attach to the back. We will leave the edge raw, as swim fabric does not fray.
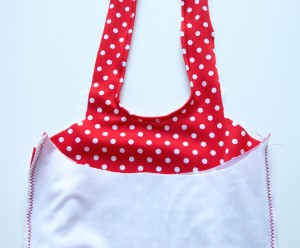
- Topstitch.
- Attach the straps to the seam in the middle of the back. They should meet in a “V” shape and should not overlap.
- Bow: Pinch the 3″ sides of the rectangle together to form a bow.
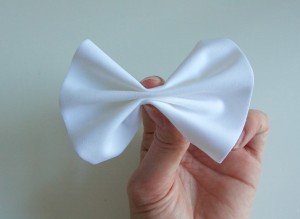
- With the sides of the 1″x2″ rectangle tucked in (forms a 1/2″x2″ rectangle), wrap around the center of the larger rectangle you are pinching together and pin in place.
- Attach your bow where the straps and back of the swim suit meet, using a straight stitch down either side of the “knot” of the bow (you could also hand stitch this if you don’t want the seams to show).
You’re FINISHED!!
Please post pictures or links to your swim suit if you’ve used my tutorial. I would LOVE to see how they turned out!

3 Comments
This is so adorable!! I’ve pinned for future reference. x #sharewithme
Thanks so much! I hope you enjoy making it as much as I did!
This is the cutest little swimsuit ever. Wish I was better at sewing I would love to make this for MM. Too cute. 😉 You are so creative and talented. Thanks for linking up to Share With Me #sharewithme