
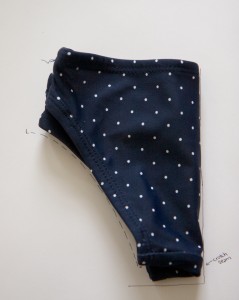
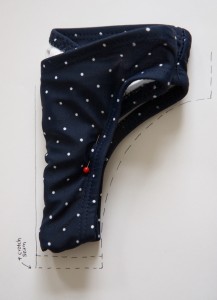
I created my own pattern using an old swim bottom. I put the swim bottom (size 9 months) on Sister and beside it being too short (can we say baby plumber crack?), it was just the right width which is what I needed. I drafted up how I thought the swim suit would be constructed and decided which measurements to take whenever I could get Sister to sit still (yes, it took some time).
This is the first time I’ve ever made a pattern for a sewing project. I’ve either winged the whole thing or used a pre-purchased pattern. I never knew I could make one myself until I started thinking about how the swim suit was constructed, read up on tutorials and just started sketching it out. You really can do anything you put your mind to and I hope this is a little bit of an inspiration for those of you who have been hesitant to make your own swim suit. You can do it as long as you have some time and patience. You can tell by my pattern that I had to play with lines a little to get the look I wanted. Swim suit patterns are all fairly similar and you should be able to create whichever design your heart desires. Below is how I created my pattern if you’d like to do the same or create a different one of your own. You’ll end up with four pieces of your pattern, one for the front of the suit, one for the back, for the bow and the flutter sleeves.
Let’s start with the back pattern:
- Using a swim bottom that fits, fold it in half, booty side on the outside. If you don’t already have a swim bottom or swim suit, you can use a onesie for guidance.
- Trace around everything except the top. Take notice of where the crotch seam is. Most swim suits have that seam about an inch (give or take) toward the back. Make sure you trace where that seam line is.
- Note the side that you folded with a big “FOLD” on your pattern.
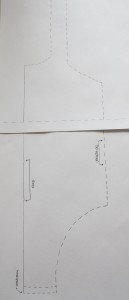
- Decide how far up the back you want the swim suit to go. I wanted a little over halfway up her back and that measured about 10 inches. Extend the “FOLD” line to the length of your measurement (in my case, 10 inches).
- Measure the length between the top of the leg hole and where you want the suit to stop at the armpit (my measurement was about 7.5 inches). Extend the line opposite of your “FOLD” line to the length of your measurement (I drew my line at a slight angle, toward the “FOLD” line so it wouldn’t be loose up top). Mark this measurement (I labeled mine “length A”), you’ll need to refer back to it later.
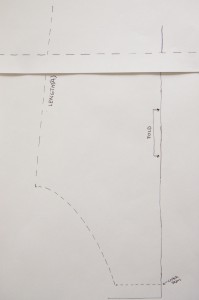
- Connect the “FOLD” line and “length A” line with a curved line. Remember that the swim suit will dip down in the back so the top of the “FOLD” line should be lower than the top of the “length A” line.
- Add seam allowances to everything but the “FOLD” line. The leg opening and the last line that you drew (basically, all curved lines) should have a 3/8″ seam allowance while the crotch line and “length A” line should have a 1/2″ seam allowance (The large seam allowance allows you to sew to the fit. If your child is fairly thin, use the entire 1/2″ seam allowance. If your child is a little bigger, sew a 1/4″ seam allowance).
- Ta-da! You’ve finished the back pattern. How does it look? I cut mine out and held it up to Sister as much as possible to make sure the swim suit went up the back as far as I had originally wanted.
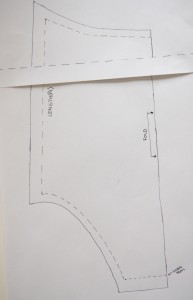
Now for the front pattern:
- Fold the swim bottom in half, booty side on the inside (you may need to tuck/pin the booty in to get the proper tracing of the leg hole.
- Trace around everything except the top. Remember to look at how far that crotch seam went up the back and add that amount to the bottom of the pattern.
- Note the side that you folded with “FOLD” on your pattern.
- Determine how far up you want the neckline to go. Mine was about 16.5 inches. Remember, you can always cut this down further but you can’t add length once you cut the fabric. Extend the “FOLD” line to the length of your measurement.
- Remember the “length A” measurement? Whatever that measurement was, it’ll be the same for the line opposite of the “FOLD” line. Go ahead and mark that line “length A” on this pattern too. Extend the “length A” line to the measurement amount (again, my measurement was 7.5 inches).

- Determine how wide you want your neck line to be. I decided on 3 inches. Make a mark half of your determined length from the top of your “FOLD” line (in my case 1.5 inches).
- I wanted my finished straps to be 1 inch in width so from where you just marked, draw two lines extending upward, one inch apart.
- Connect both your “FOLD” line and the “length A” line to your straps with curved lines. Keep in mind the shape you want for your neckline (square or round) and if you line up your back pattern piece (match “length A” with “length A”), you can draw a smooth line to the straps from your “length A” line.
- Determine the length needed for your straps (Mine ended up being 9 inches but when I cut the fabric, I wound up cutting even more length. Again, you can always cut if it’s too big but it’s quite difficult to add length later.). Extend your 1 inch straps to that length.
- Add seam allowances to everything but the “FOLD” line. The leg opening, neck line and straps (basically, all curved lines and the straps) should have a 3/8″ seam allowance while the crotch line and “length A” line should have a 1/2″ seam allowance.
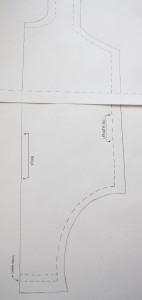
- Whew! You’re finished with the front pattern. Go ahead and cut it out and hold up the pattern to your little one to gauge as much as possible if it’s the correct size.
Accessories (you can use the same or a contrasting color of swim fabric for this part):
- For the bow, you’ll need 2 rectangles of fabric: 1 rectangle 3″x4″ and 1 rectangle 1″x2″
- For the flutter sleeves, you’ll need 2 rectangles (same size) of the same fabric you used for the bow, 2″x 19″.
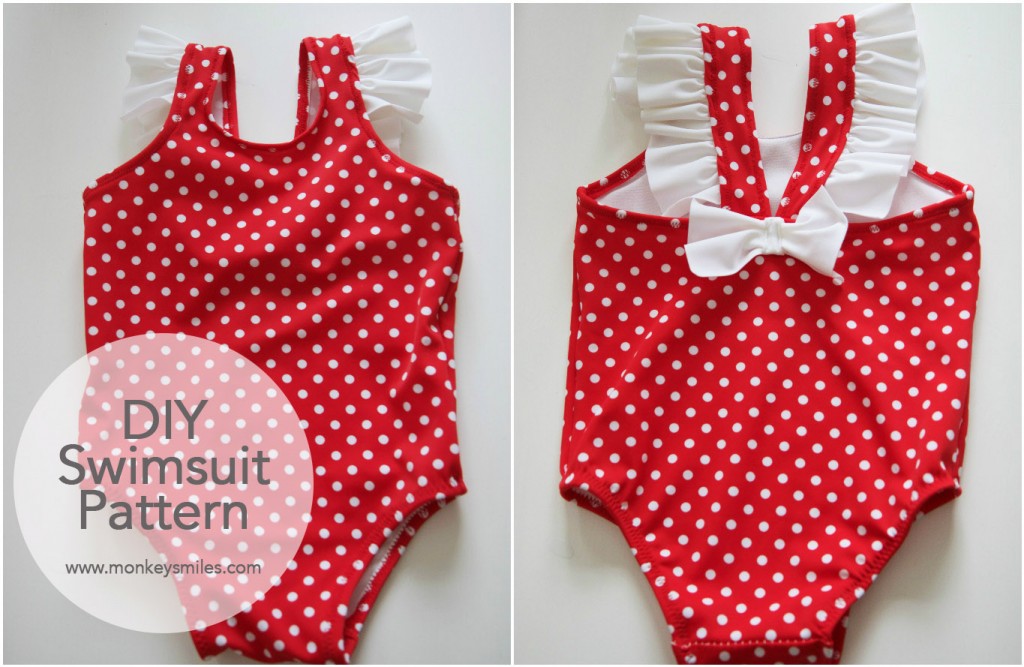
To see how the swim suit is constructed or if you want to download my 12-18 month pattern, click on the photo.
For more pictures and a different perspective of creating your own pattern, check out the blog at zaaberry. She has some awesome tutorials! Leave me a comment if you now have the confidence to tackle making your own swimsuit. I’d love to see finished products as well!
If you enjoyed this post, sign up for my weekly newsletter via email. And if you share, I might just love you forever!
[contact-form][contact-field label=’Name’ type=’name’ required=’1’/][contact-field label=’Email’ type=’email’ required=’1’/][contact-field label=’Website’ type=’url’/][/contact-form]


11 Comments
Super cute swimsuit! I love the polka dots and ruffles! Working with stretchy material can be challenging, I’m super impressed!
Thank you! Don’t look too closely at the stitching. I may have gotten into a fight or two with my sewing machine 🙂
Unfortunately, the link in the picture for the pattern does not work. It comes up “page not found”. Is there any other way to get the pattern?
Sorry about that! Thanks for letting me know. It should be working now but if you have more issues with it, I’d be happy to email it to you 🙂
Thank you so much! I must be completely tech challenged 🙂 could you email it to me?
Never mind! I found it YAY! Now to find some awesome swim fabric, love your polka dots by the way!!!!
Oh awesome! Thank you! I found that thefabricfairy.com has the best selection of swim fabric if you’re looking to buy online. I’d love to see pictures when you’re done!
I will have to check thefabricfairy out, I’ve never heard of them. And I will definitely share a photo if I take the chance to sew one up! (I’ve never sewn a swimsuit before)
Good, I hope you do! This was my first swimsuit too. It was a little bit of a pain here and there but ultimately, I’m pretty happy with how it turned out 🙂
This is such a great tutorial! It’s getting closer to that time, and I’ll be trying it out. We are traveling to Texas for a whole month this summer! Can’t wait to do this with my sister!
Have fun in Texas! I’m excited to see how yours turns out!